本文为 K8s API 和控制器 系列文章之一

👀 APIService

如果我们在创建 crd/foos.hello.zeng.dev 之后查询 APIService 列表,会看到一个名为 v1.hello.zeng.dev 的 APIService 对象随之被创建

kubectl apply -f https://raw.githubusercontent.com/phosae/x-kubernetes/master/api/artifacts/crd/hello.zeng.dev_foos.yaml

kubectl get apiservice | awk 'NR==1 || /hello/'
NAME                                   SERVICE   AVAILABLE   AGE
v1.hello.zeng.dev                      Local     True        15s

实际上 kube-apiserver 中的每个 API Group 版本都会有 APIService 与之对应,Local 表示请求在本地进程处理

kubectl get apiservice

NAME                                   SERVICE   AVAILABLE   AGE
v1.                                    Local     True        20h  <--- core/legacy version.group 
v1.apps                                Local     True        20h
v1.autoscaling                         Local     True        20h
v1.hello.zeng.dev                      Local     True        15s  <--- our crd version.group
v2.autoscaling                         Local     True        20h

以 CRD APIService/v1.hello.zeng.dev 为模版,增加 service 声明,表明对应版本 API 由集群内某 Serivce 背后 Pod 提供。 即可将 Custom Resource 实现从 kube-apiserver 内 apiextensions-apiserver 模块 更换为自己的 custom apiserver 实现。

 1
 2
 3
 4
 5
 6
 7
 8
 9
10
11
12
13
14
# APIService for CRD               ---> # APIService from scratch
apiVersion: apiregistration.k8s.io/v1 | apiVersion: apiregistration.k8s.io/v1
kind: APIService                      | kind: APIService
metadata:                             | metadata:
  name: v1.hello.zeng.dev             |   name: v1.hello.zeng.dev
spec:                                 | spec:
  group: hello.zeng.dev               |   group: hello.zeng.dev
  groupPriorityMinimum: 1000          |   groupPriorityMinimum: 100 
  version: v1                         |   version: v1
  versionPriority: 100                |   versionPriority: 10
                                      | + service:
                                      | +   name: apiserver
                                      | +   namespace: hello
                                      | + insecureSkipTLSVerify: true

之后,kube-apiserver 就会将 /apis/hello.zeng.dev/v1/** 前缀请求,代理给我们即将要实现的 hello.zeng.dev-apiserver 处理,而非委托给 CRD 实现 apiextensions-apiserver。

1
2
3
4
Req /apis/hello.zeng.dev/v1/** ---> kube-apiserver 👉👉👉 hello.zeng.dev-apiserver ✅
                                        ⬇️
                                    apiextensions-apiserver    

🎯 Goals

最终目标类似 K8s CustomResourceDefinitions (CRD) 原理

command Action HTTP method
kubectl create -f ./foo.yml create POST
kubectl get fo myfoo get GET
kubectl apply -f ./foos.yml update or create PATCH or POST
kubectl delete fo myfoo delete DELETE

🤔 How and Why

独立 custom apiserver 需实现下列 API

  • for API Discovery
    • /apis ➡️ APIGroupList or APIGroupDiscoveryList (1.26+
    • /apis/hello.zeng.dev ➡️ APIGroup
    • /apis/hello.zeng.dev/v1 ➡️ APIResourceList
  • for OpenAPI Schema
    • /openapi/v2 ➡️ OpenAPI Specification v2 or
    • /openapi/v3 ➡️ OpenAPI Specification v3
  • for Foo CRUD
    • /apis/hello.zeng.dev/v1/foos
    • /apis/hello.zeng.dev/v1/namespaces/{namespace}/foos
    • /apis/hello.zeng.dev/v1/namespaces/{namespace}/foos/{name}

API Discovery 表面是支持 kubectl 使用

  • 1.27 后 /apis 需支持返回 APIGroupDiscoveryList
  • 1.27 前 /apis 需返回 APIGrouList 和 /apis/hello.zeng.dev/v1 需返回 APIResourceList

它实际是各种客户端与 kube-apiserver 交互的基础,被用来支持 RESTMapper。RESTMapper 负责完成 kubernetes resource 到 kind 的转换,是序列化/反序列化的基础。

1.16 之后,/apis/hello.zeng.dev/v1 还涉及了 APIService 探活,该接口如果返回非 200 会导致 custom apiserver 无法集成到 kube-apiserver。

OpenAPI Specification 为非必需,作用包括:

🔥 Implement API Discovery

API Discovery 实现只需在代码提前定义好字符串或者对象,程序运行时直接读内存响应即可

/apis 实现 如下

省略 APIGroupDiscoveryList 变量 apidiscoveries

 1
 2
 3
 4
 5
 6
 7
 8
 9
10
11
12
13
14
15
16
17
18
19
20
21
22
23
24
25
26
27
28
29
30
31
32
33
34
35
36
37
38
39
40
41
42
43
44
45
46
47
48
49
var apis = metav1.APIGroupList{
	TypeMeta: metav1.TypeMeta{
		Kind:       "APIGroupList",
		APIVersion: "v1",
	},
	Groups: []metav1.APIGroup{
		{
			TypeMeta: metav1.TypeMeta{
				Kind:       "APIGroup",
				APIVersion: "v1",
			},
			Name: "hello.zeng.dev",
			Versions: []metav1.GroupVersionForDiscovery{
				{
					GroupVersion: "hello.zeng.dev/v1",
					Version:      "v1",
				},
			},
			PreferredVersion: metav1.GroupVersionForDiscovery{GroupVersion: "hello.zeng.dev/v1", Version: "v1"},
		},
	},
}

var apidiscoveries = ...

//@Router /apis [get]
func APIs(w http.ResponseWriter, r *http.Request) {
	var gvk [3]string
	for _, acceptPart := range strings.Split(r.Header.Get("Accept"), ";") {
		if g_v_k := strings.Split(acceptPart, "="); len(g_v_k) == 2 {
			switch g_v_k[0] {
			case "g":
				gvk[0] = g_v_k[1]
			case "v":
				gvk[1] = g_v_k[1]
			case "as":
				gvk[2] = g_v_k[1]
			}
		}
	}

	if gvk[0] == "apidiscovery.k8s.io" && gvk[2] == "APIGroupDiscoveryList" {
		w.Header().Set("Content-Type", "application/json;g=apidiscovery.k8s.io;v=v2beta1;as=APIGroupDiscoveryList")
		w.Write([]byte(apidiscoveries))
	} else {
		w.Header().Set("Content-Type", "application/json")
		renderJSON(w, apis)
	}
}

/apis/hello.zeng.dev 实现 只需返回 /apis 数组中第一个对象即可

/apis/hello.zeng.dev/v1 实现 确实也可以采用 metav1.APIResourceList,直接使用字符串看这简洁些

 1
 2
 3
 4
 5
 6
 7
 8
 9
10
11
12
13
14
15
16
17
18
19
20
21
22
23
24
25
26
27
28
29
30
31
32
const hellov1Resources = `{
	"kind": "APIResourceList",
	"apiVersion": "v1",
	"groupVersion": "hello.zeng.dev/v1",
	"resources": [
	  {
		"name": "foos",
		"singularName": "foo",
		"namespaced": true,
		"kind": "Foo",
		"verbs": [
		  "create",
		  "delete",
		  "get",
		  "list",
		  "update",
		  "patch"
		],
		"shortNames": [
		  "fo"
		],
		"categories": [
		  "all"
		]
	  }
	]}`

// @Router  /apis/hello.zeng.dev/v1 [get]
func APIGroupHelloV1Resources(w http.ResponseWriter, _ *http.Request) {
	w.Header().Set("Content-Type", "application/json")
	w.Write([]byte(hellov1Resources))
}

☸️ Generate OpenAPI Specification

定义好 Foo struct,引用官方库 k8s.io/apimachinery 添加 Kubernetes objects 必须字段 apiVersion, kind 和 metadata。

再创建函数声明 PostFoo 支持在任意 namespace 创建 Foo

 1
 2
 3
 4
 5
 6
 7
 8
 9
10
11
12
13
14
15
16
17
18
19
20
21
22
23
24
25
26
27
28
29
30
31
package main

import (
  "net/http"
  metav1 "k8s.io/apimachinery/pkg/apis/meta/v1"
)

type Foo struct {
	metav1.TypeMeta   `json:",inline"`
	metav1.ObjectMeta `json:"metadata,omitempty"`

	Spec struct {
		// Msg says hello world!
		Msg string `json:"msg"`
		// Msg1 provides verbose information
		Msg1 string `json:"msg1"`
	} `json:"spec"`
}

// PostFoo swag doc
// @Summary      Create a Foo Object
// @Description  Create a Foo Object
// @Tags         foos
// @Consume      json
// @Produce      json
// @Param        namespace	path	string  true  "Namepsace"
// @Success      201  {object}  Foo
// @Router       /apis/hello.zeng.dev/v1/namespaces/{namespace}/foos [post]
func PostFoo(w http.ResponseWriter, r *http.Request) {
  ...
}

注意到函数声明上头有不少注释,目的是使用 swaggo/swag 从 Go 代码和注释生成 OpenAPI Specification v2(很可惜目前并不支持 v3)。 生成结果如下(已转化为 Yaml,原 JSON 文件点 这里

 1
 2
 3
 4
 5
 6
 7
 8
 9
10
11
12
13
14
15
16
17
18
19
20
21
22
23
24
25
26
27
28
29
30
31
32
33
34
35
36
37
38
39
40
41
42
43
swagger: '2.0'
paths:
  "/apis/hello.zeng.dev/v1/namespaces/{namespace}/foos":
    post:
      description: Create a Foo Object
      produces:
      - application/json
      tags:
      - foos
      summary: Create a Foo Object
      parameters:
      - type: string
        description: Namepsace
        name: namespace
        in: path
        required: true
      responses:
        '201':
          description: Created
          schema:
            "$ref": "#/definitions/main.Foo"
definitions:
  main.Foo:
    type: object
    properties:
      apiVersion:
        description: "..."
        type: string
      kind:
        description: "..."
        type: string
      metadata:
        "$ref": "#/definitions/v1.ObjectMeta"
      spec:
        type: object
        properties:
          msg:
            description: Msg says hello world!
            type: string
          msg1:
            description: Msg1 provides some verbose information
            type: string
  v1.ObjectMeta: {...}

生成的 OpenAPI Specification 文件 swagger.json 存放在 docs 目录。 Golang 支持在二进制程序内嵌静态文件,使用 embed.FS 内嵌 docs 目录。 服务接收到 GET /openapi/v2 请求时,返回 OpenAPI Specification 内容即可。

注意点:kubectl 可能只接受 Protobuf 格式,需要特别判断并做转换(利用 google/gnostic)。

 1
 2
 3
 4
 5
 6
 7
 8
 9
10
11
12
13
14
15
16
17
18
19
20
21
22
23
24
25
26
27
28
29
30
31
32
33
34
35
36
37
38
39
40
41
42
import(
	"embed"
	"net/http"
	"strings"

	gnosticopenapiv2 "github.com/google/gnostic/openapiv2"
	"google.golang.org/protobuf/proto"
)

//go:embed docs/*
var embedFS embed.FS

//@Router	/openapi/v2	[get]
func OpenapiV2(w http.ResponseWriter, r *http.Request) {
	jsonbytes, _ := embedFS.ReadFile("docs/swagger.json")

	// 😭 kubectl (v1.26.2, v1.27.1 ...) api discovery module (which fetch /openapi/v2, /openapi/v3)
	//    only accept application/com.github.proto-openapi.spec.v2@v1.0+protobuf
	if !strings.Contains(r.Header.Get("Accept"), "application/json") && strings.Contains(r.Header.Get("Accept"), "protobuf") {
		w.Header().Set("Content-Type", "application/com.github.proto-openapi.spec.v2.v1.0+protobuf")
		if pbbytes, err := ToProtoBinary(jsonbytes); err != nil {
			w.Header().Set("Content-Type", "application/json")
			writeErrStatus(w, "", http.StatusInternalServerError, err.Error())
			return
		} else {
			w.Write(pbbytes)
			return
		}
	}

	// 😄 kube apiserver aggregation module accept application/json
	w.Header().Set("Content-Type", "application/json")
	w.Write(jsonbytes)
}

func ToProtoBinary(json []byte) ([]byte, error) {
	document, err := gnosticopenapiv2.ParseDocument(json)
	if err != nil {
		return nil, err
	}
	return proto.Marshal(document)
}

🪬🪬🪬: kube-apiserver 获取到 hello.zeng.dev-apiserver 提供的 OpenAPI Specification v2 后, 会将其合并到 /openapi/v2,同时也会将其转换为 OpenAPI Specification v3 合并在 /openapi/v3

🦀 CRUD Foo

定义好数据结构之后,我们利用内存 map 存储 Foo 对象们,并在程序初始化阶段自动写入一个名为 bar 的 Foo 对象。

 1
 2
 3
 4
 5
 6
 7
 8
 9
10
11
12
13
14
15
16
var x sync.RWMutex
var foos = map[string]Foo{}

func init() {
	foos["default/bar"] = Foo{
		TypeMeta:   metav1.TypeMeta{APIVersion: "hello.zeng.dev/v1", Kind: "Foo"},
		ObjectMeta: metav1.ObjectMeta{Namespace: "default", Name: "bar", CreationTimestamp: metav1.Now()},
		Spec: struct {
			Msg  string "json:\"msg\""
			Msg1 string "json:\"msg1\""
		}{
			Msg:  "hello world",
			Msg1: "apiserver-from-scratch says '👋 hello world 👋'",
		},
	}
}

之后便是围绕存储增删改查并包装出 HTTP API,较复杂的是 Patch,它在 Kubernetes 中存在多种策略

1
2
3
4
5
6
7
apiVersion: hello.zeng.dev/v1                               | apiVersion: hello.zeng.dev/v1
kind: Foo                                                   | kind: Foo
metadata:                                                   | metadata:                                          
  name: bar                                                 |   name: bar
spec:                                                       | spec:
  msg: hello world                                          |   msg: hi there
  msg1: "apiserver-from-scratch says '👋 hello world 👋'"    |   msg1: ''

左边 Foo 修改成右边,使用 kubectl 有这么几种方式

application/json-patch+json JSON Patch, RFC 6902

kubectl patch fo/bar --type json -p='[
	{"op": "replace", "path": "/spec/msg", "value":"hi there"},
	{"op": "replace", "path": "/spec/msg1", "value":""}]'

application/merge-patch+json JSON Merge Patch, RFC 7386

kubectl patch fo/bar --type merge -p='{"spec": {"msg": "hi there", "msg1": ""}}'

or

cat << EOF | kubectl apply -f -
apiVersion: hello.zeng.dev/v1
kind: Foo
metadata:  
  name: bar
spec:
  msg: hi there
  msg1: ''
EOF

👻👻👻 kubectl apply 逻辑:目标不存在时,用 POST 创建;目标存在时,用 Patch 更新

application/strategic-merge-patch+json

kubectl patch fo/bar --type strategic -p '{"spec": {"$retainKeys": ["msg"], "msg":"hi there"}}'

or

kubectl patch fo/bar --type strategic -p '{"spec": {"msg":"hi there", "msg1": ""}}'

application/json-patch+jsonapplication/merge-patch+json 使用 evanphx/json-patch 即可实现。

application/strategic-merge-patch+json 是 Kubernetes 定制的 patch 类型,为 JSON Merge Patch 增强版,也是 kubectl patch 使用的默认策略。上述例子中 $retainKeys 意思为只保留哪些字段,其余的删除,再执行 merge patch。处理数组时,只需提供变动 object,它就能对数组中单个元素执行更新,而无需提供整个数组。其语法相比较 JSON Patch 更为直观简略(使用 name 替代了数组索引)

source: [{"name": "Alice", "age": 17}, {"name": "Bob", "age": 18}]
⬇️ change Bob's age to 18 ⬇️ 
target: [{"name": "Alice", "age": 17}, {"name": "Bob", "age": 21}]

strategic-merge-patch: [{"name": "Bob", "age": 21}]
merge-patch: [{"name": "Alice", "age": 17}, {"name": "Bob", "age": 21}]
json-patch: [{ "op": "replace", "path": "/1/age", "value": 21}]

application/strategic-merge-patch+json 可借助库 k8s.io/apimachinery/pkg/util/strategicpatch 便捷实现

 1
 2
 3
 4
 5
 6
 7
 8
 9
10
11
12
13
14
15
16
17
18
19
20
21
22
23
24
25
26
27
28
29
30
31
32
33
34
35
36
37
38
// 省略部分依赖引入和错误处理...
import(
	jsonpatch "github.com/evanphx/json-patch"
	kruntime "k8s.io/apimachinery/pkg/runtime"
	kstrategicpatch "k8s.io/apimachinery/pkg/util/strategicpatch"
)

func PatchFoo(w http.ResponseWriter, r *http.Request, name string) {
	patchBytes, _ := io.ReadAll(r.Body)
	old := foos[nsname]
	var originalBytes, _ = json.Marshal(old)
	var patchedFoo []byte

	switch r.Header.Get("Content-Type") {
	case "application/merge-patch+json":
		patchedFoo, _ = jsonpatch.MergePatch(originalBytes, patchBytes)
	case "application/json-patch+json":
		patch, _ := jsonpatch.DecodePatch(patchBytes)
		patchedFoo, _ = patch.Apply(originalBytes)
	case "application/strategic-merge-patch+json":
		var patchMap map[string]interface{}
		_ = json.Unmarshal(patchBytes, &patchMap)
		var patchedObjMap, _ = kstrategicpatch.StrategicMergeMapPatch(originalObjMap, patchMap, schema)
		var theFoo Foo
		_ = kruntime.DefaultUnstructuredConverter.FromUnstructuredWithValidation(patchedObjMap, &theFoo, false)
		patchedFoo, _ = json.Marshal(theFoo)	
	default:
		w.WriteHeader(http.StatusUnsupportedMediaType)
		return
	}

	dec := json.NewDecoder(bytes.NewReader(patchedFoo))
	dec.DisallowUnknownFields()
	var f Foo
	dec.Decode(&f)
	foos[nsname] = f
	renderJSON(w, f) // serialize new Foo as JSON, fill response body
}

HTTP GET 需要支持 Kubernetes Table 类似,对应 Accept: application/json;as=Table;v=v1;g=meta.k8s.io,application/json;as=Table;v=v1beta1;g=meta.k8s.io,application/json。 否则 kubectl get fo 只能能展示 NAME, AGE 列,而不能展示定制列。

 1
 2
 3
 4
 5
 6
 7
 8
 9
10
11
12
13
14
15
16
17
18
19
20
21
22
23
24
25
26
27
28
29
30
31
32
33
34
35
36
37
38
import(
	metav1 "k8s.io/apimachinery/pkg/apis/meta/v1"
)

var fooCol = []metav1.TableColumnDefinition{
	{Name: "Name", Type: "string", Format: "name", Description: metav1.ObjectMeta{}.SwaggerDoc()["name"]},
	{Name: "Age", Type: "string", Description: metav1.ObjectMeta{}.SwaggerDoc()["creationTimestamp"]},
	{Name: "Message", Type: "string", Format: "message", Description: "foo message"},
	{Name: "Message1", Type: "string", Format: "message1", Description: "foo message plus", Priority: 1}, // kubectl -o wide
}

func tryConvert2Table(obj interface{}, acceptedContentType string) interface{} {
	if strings.Contains(acceptedContentType, "application/json") && strings.Contains(acceptedContentType, "as=Table") {
		switch typedObj := obj.(type) {
		case Foo:
			return metav1.Table{
				TypeMeta: metav1.TypeMeta{
					Kind:       "Table",
					APIVersion: "meta.k8s.io/v1",
				},
				ColumnDefinitions: fooCol,
				Rows:              foo2TableRow(&typedObj),
			}
		case FooList:
			return metav1.Table{
				TypeMeta: metav1.TypeMeta{
					Kind:       "Table",
					APIVersion: "meta.k8s.io/v1",
				},
				ColumnDefinitions: fooCol,
				Rows:              fooList2TableRows(&typedObj),
			}
		default:
			return obj
		}
	}
	return obj
}

最后,值得注意的是异常处理也要遵从 Kubernetes 规范,返回如下结构。实现上可以利用 k8s.io/apimachinery 包提供的结构

metav1 "k8s.io/apimachinery/pkg/apis/meta/v1"
return metav1.Status{
	TypeMeta: metav1.TypeMeta{APIVersion: "v1", Kind: "Status"},
	Status:   "Failure",
	Message:  "foos 'x' not found",
	Reason:   "Not Found",
	Details: &metav1.StatusDetails{
		Group: "hello.zeng.dev",
		Kind:  "foos",
		Name:  "x"
	},
	Code: 404
}

也可以直接渲染 String Template 返回

var kstatusTmplate = `{
	"kind":"Status",
	"apiVersion":"v1",
	"metadata":{},
	"status":"Failure",
	"message":"%s",
	"reason":"%s",
	"details":{"group": "hello.zeng.dev", "kind":"foos", "name":"%s"},
	"code": %d
}
return fmt.Sprintf(kstatusTmplate, fmt.Sprintf(`foos '%s' not found`, "x"), http.StatusText(http.StatusNotFound), "x", http.StatusNotFound)

其他部分,POST GET DELETE PUT 实现都较为简单,在这里可以查看 apiserver-from-scratch 源码

🎮 Let’s Play

拉取项目 x-kubernetes(并顺手 star ⭐🤩🌈

git clone https://github.com/phosae/x-kubernetes.git
cd x-kubernetes

独立模式 go run main.go
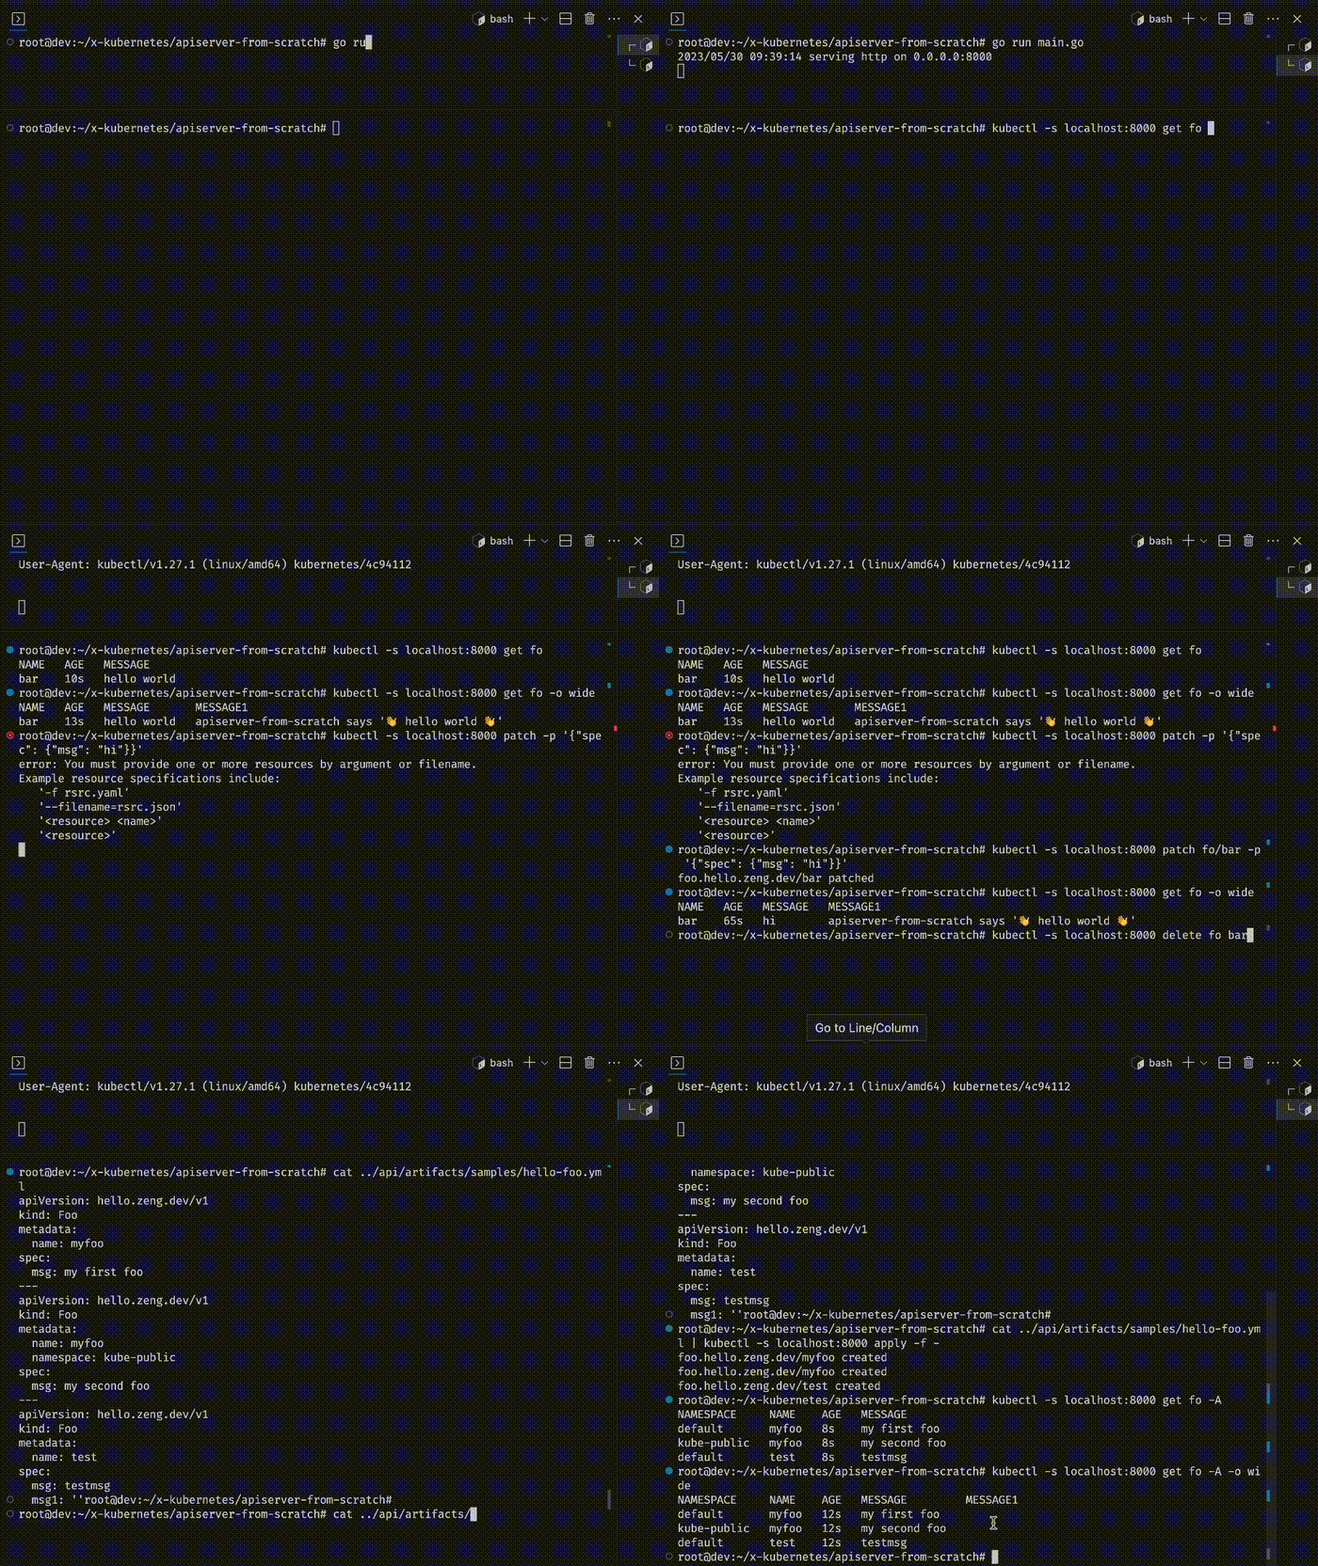
设置测试 K8s 集群

make localenv
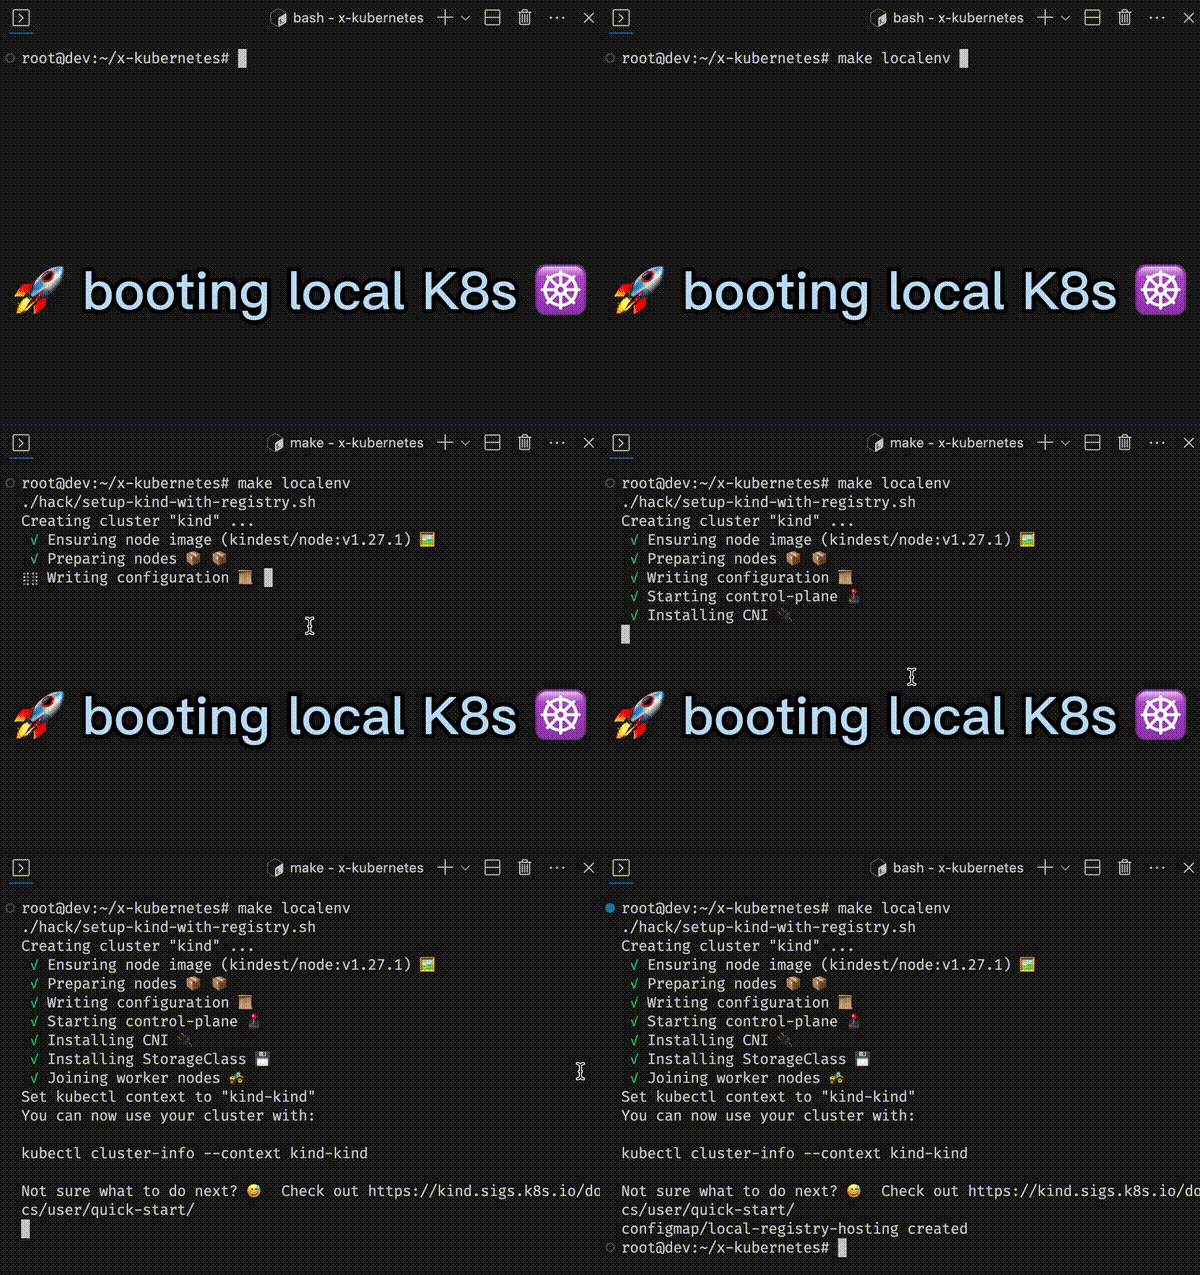
以 aggregation 模式集成到 kube-apiserver

cd apiserver-from-scratch
make deploy
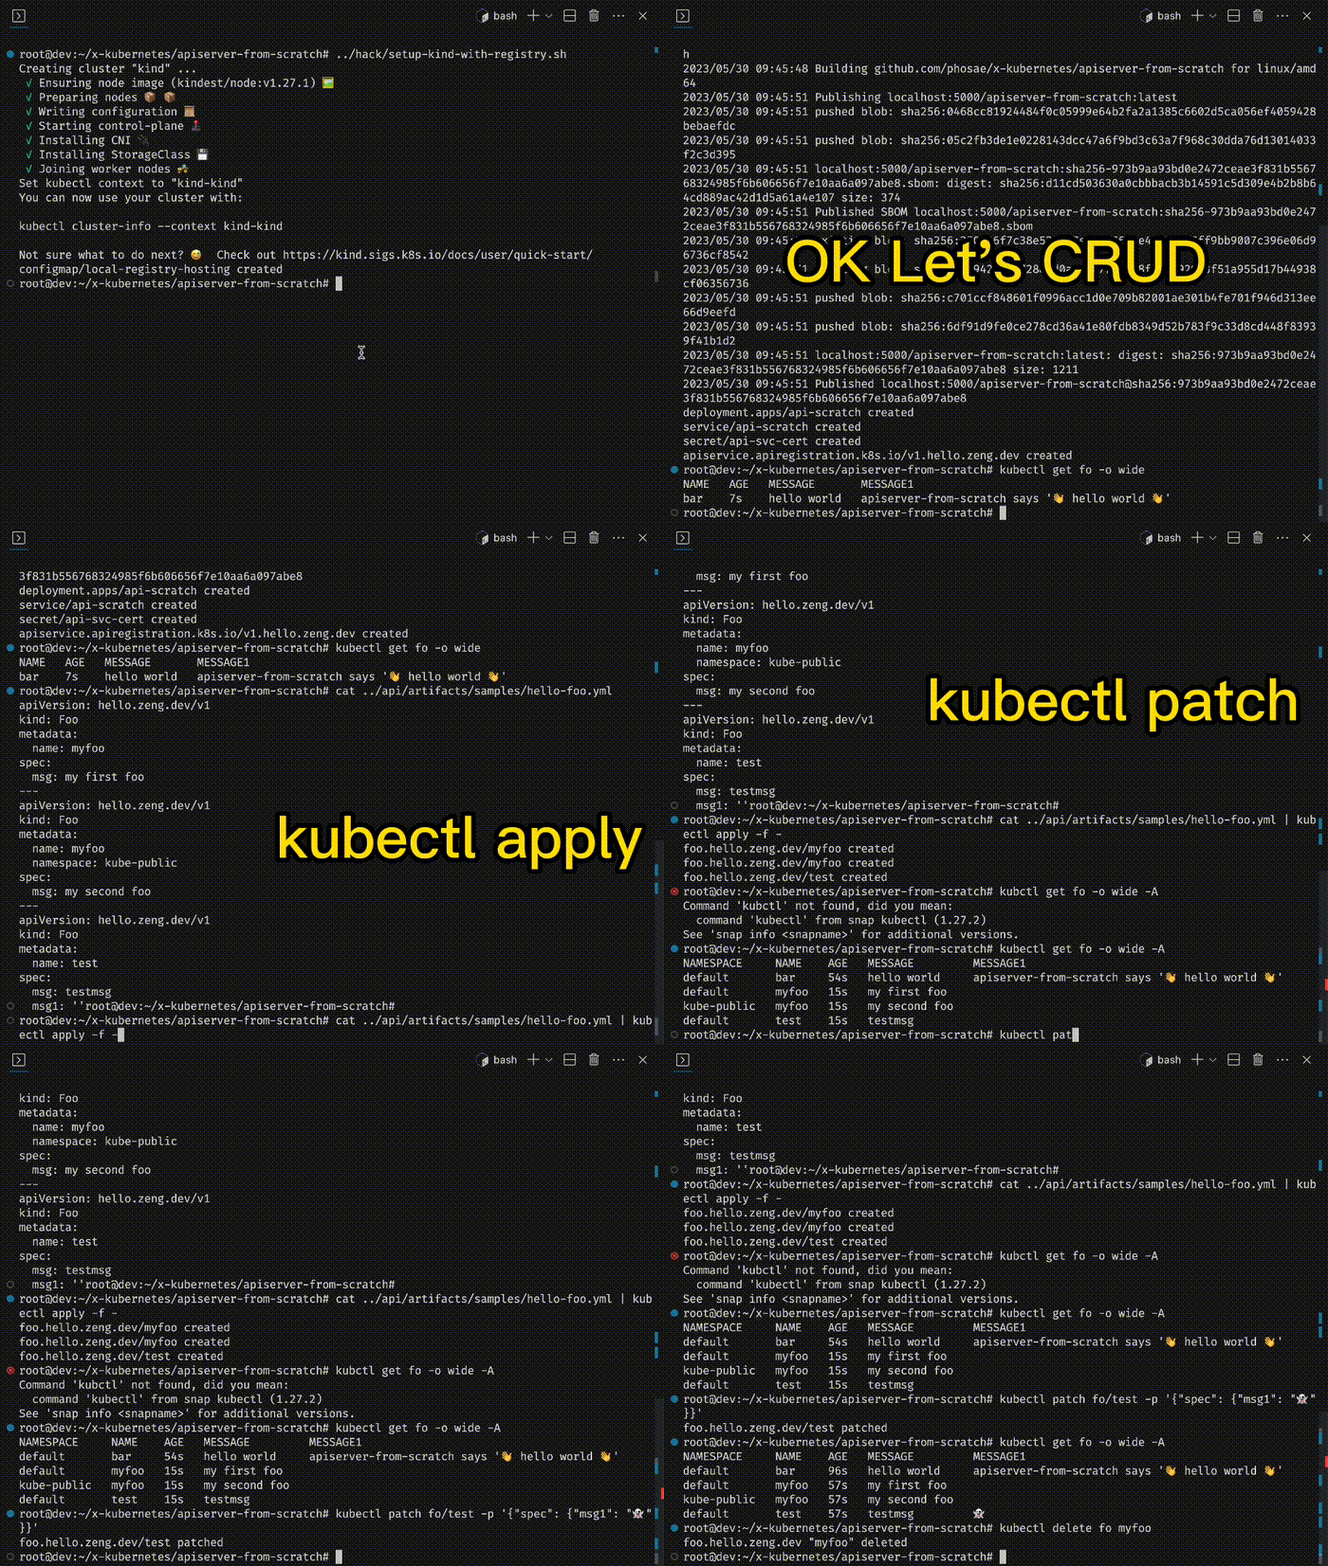
可注意到 APIService/v1.hello.zeng.dev 指向了 service/api-scratch,而 service/api-scratch 背后存在 Pod 提供 API 服务

kubectl get apiservices.apiregistration.k8s.io/v1.hello.zeng.dev -o wide
NAME                SERVICE               AVAILABLE   AGE
v1.hello.zeng.dev   default/api-scratch   True        5m

kubectl get service/api-scratch 
NAME          TYPE        CLUSTER-IP      EXTERNAL-IP   PORT(S)   AGE	SELECTOR
api-scratch   ClusterIP   10.108.222.11   <none>        443/TCP   5m	app=api-scratch

kubectl get po -l app=api-scratch
NAME                           READY   STATUS    RESTARTS   AGE
api-scratch-7d5759d8cb-vmmpm   1/1     Running   0          5m

📝 Summarize

手写极简 apiserver 有助于我们真正理解

  • K8s API REST 协议
  • K8s apiserver aggregation 原理
  • kubectl 与 apiserver 的交互机制

它表明,只用少量社区依赖(K8s meta API 库和几个工具库),基于 Go 自带的 http 库,500 行上下代码量,就能实现一个 K8s 风格的 apiserver。

root@dev:~/x-kubernetes/apiserver-from-scratch# cat go.mod

require (
    github.com/evanphx/json-patch v4.12.0+incompatible
    github.com/google/gnostic v0.5.7-v3refs
    google.golang.org/protobuf v1.28.1
    k8s.io/apimachinery v0.27.1
) ...

root@dev:~/x-kubernetes/apiserver-from-scratch# cloc main.go 
	1 text file.
	1 unique file.                              
	0 files ignored.

github.com/AlDanial/cloc v 1.90  T=0.02 s (45.4 files/s, 32245.0 lines/s)
-------------------------------------------------------------------------------
Language                     files          blank        comment           code
-------------------------------------------------------------------------------
Go                               1             69            127            523
-------------------------------------------------------------------------------

倘若不实现 API Discovery 和 OpenAPI Specification,2-300 行代码就够了。

相对标准实现,初看这个 apiserver 目前还缺少这些特性

  • authentication 和 authorization,不区分请求来源,接收任意客户端请求,且没有权限控制,任意用户都拥有增删改查权限
  • watch,比如 GET /apis/hello.zeng.dev/v1/watch/foos,或者 GET /apis/hello.zeng.dev/v1/foos?watch=true
  • list 分页
  • 数据持久

🐝🐝🐝 如果请求路径是 request ➡️ kube-apiserver ➡️ hello.zeng.dev-apiserver,kube-apiserver 自身会对请求执行 authentication 和 authorization。但服务运行在集群中时,无法杜绝 request ➡️ hello.zeng.dev-apiserver(有时甚至有这种需求)。

每实现一个特性,代码量都会增加,且极可能是成倍增加。倘若你想到了较为简洁的实现方式,可以给项目提 Pull Request (apiserver-from-scratch 源码)。 我后续倘若灵光一闪,也可能会补充若干实现。

🦀🦀🦀 也许可以用 Rust 重写一遍

也不是每一类 custom resource 都需要全部特性。如 metrics-server,就不需要持久数据。

获得这些额外特性的更好的方式,是直接集成 K8s 库获。这比从头写便捷很多。请查阅本系列文章之 使用 library 实现 K8s apiserver